How to Use a Multimeter on a Car
Electrical issues in a car are often tricky to troubleshoot and solve. In most cases, the failure of certain mechanical aspects of your car can be directly linked to auto-electric problems. This is why car owners should have and know how to use a multimeter on a car.
This essential tool helps you confirm the presence of voltage and continuity in the wiring of your car.
If you already have a multimeter and don’t know where to start, here is a quick guide on how to use it to diagnose different electric issues in your car.
What is a Multimeter?
Chances are, you have seen your mechanic use this device when you take your car for servicing or repair.
A multimeter is a special tool used to measure voltage, resistance, and current.
Conventional multimeters are rectangular shaped, handheld digital devices that have probes that you connect to the wires you wish to test.
If a certain electrical component of your car is faulty then the reason could be a defective wire causing short-circuiting.
How a Multimeter Works?
Since there are thousands of wires in a car, identifying the particular one that is defective could be time-consuming and tiresome. This is where a multimeter comes in handy. It can help you find the exact wire that is causing a short circuit.
You can identify this by checking for the wire that lacks voltage. To know where the short is occurring in the wire, you will have to measure continuity.
Before using a multimeter, you should set its range and parameters depending on what you intend to measure. Always apply the parking brake before measuring anything as well.
For car owners intending to measure amperage, strictly use the fused port for your probes. The red probe is the positive one whereas the black probe is the negative one.
On the other hand, to measure the voltage of your car, use DC voltage and set it to 20V. Connect it to the component you wish to measure and take a reading.
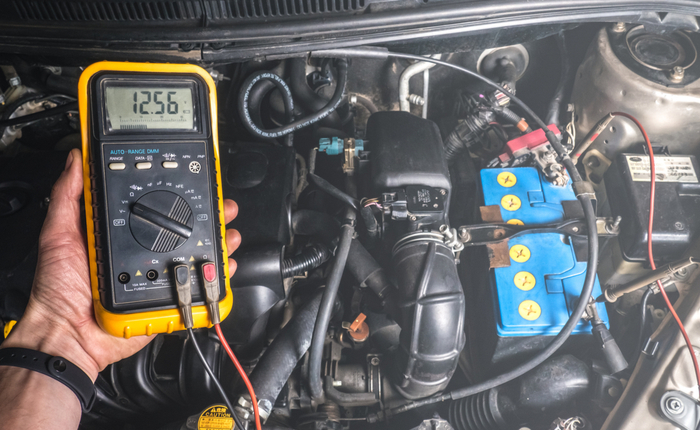
How to Check a Car Battery with a Multimeter?
There are a couple of reasons why your car may not start. One of the most common reasons is a weak car battery. To conclude that your battery is to blame, you should test it with a multimeter.
This way you not only rule out other electrical issues but also know how much charge is left in your battery.
To test your car battery’s voltage with a multimeter, you will need to set it to 20V DC. Then carefully connect the probes of your multimeter to the respective terminals, positive to positive and negative to negative.
To get a much better reading, we strongly advise you have another person turn the headlights on when your car is switched off and take the reading.
The readings on your multimeter will range from 11.8V to 12.6V. The lower the voltage reading you get, the lower the charge left in your car.
Readings below 11.9V indicate that your battery is about to die and should be replaced as soon as possible. If you get a reading of 12.5V, then your battery is nearly fully charged.
How to Check a Fuse with a Multimeter?
A blown fuse can cause electrical issues that may be minor but can affect your driving experience. If your radio isn’t turning on, your interior lights or climate control features are not working, a dead fuse may be the culprit.
Fortunately, with a multimeter you can check if your fuse is working properly. You just have to set it to your lowest ohm settings then place the probes on the fuse caps.
If a fuse is blown, then the resistance value will not change when you connect the probes. And if you get low ohm readings then your fuse is working just fine.
How to Use a Multimeter to Check the Alternator?
Another reason why your car may not start can be a failing alternator. The purpose of an alternator is to recharge your car through the natural mechanical movements. Therefore to check if it’s working, you should observe how your battery responds under different electrical loads.
There is no direct way for you to connect the probes to an alternator, you will, therefore, have to measure the battery once more. Set it to 20V DC, take measurement when your car is switched off. The ideal reading should be 12.4V.
Start the car and test the battery once more. The ideal reading should be 14V. Anything below 14V indicates a faulty alternator.
Additionally, you should turn on other electrical components in your car and see if the reading changes. A reading of below 13V when the radio or headlights is on can indicate a faulty alternator.
Check out our complete guide on how to check an alternator.
Bottom Line
For many motorists, electrical problems prove to be a challenge.
Finding and solving electrical issues especially narrowing down to the defective electrical components needs a lot of effort.
However, with the rights set of tools such as a multimeter, you can easily test if your car battery, alternator, and fuses are working properly without leaving your garage.