How to Test an Alternator

On one hectic morning, you wake up late for work. In a hurry, you prepare yourself and rush to your car.
In the back of your mind, you are so glad that you own a car because it will get you to your office faster.
But, when you turn the key, your engine won’t start.
You try again and the results are the same. It could be your car battery, but it could also be your alternator.
Fortunately for you, testing a vehicle’s alternator is relatively easy and fast. Below is a quick guide on how to test an alternator.
What is an Alternator?
You have probably heard about alternators and how they produce alternating current.
But what really is an alternator?
In most car electrical issues, the problem usually results from the battery or alternator. Car batteries produce direct current whereas the alternator as mentioned above produces alternating current.
It is a generator that produces electricity through electromagnetism.
And can be used to power up the car’s audio system, power your car lights and charge mobile devices. It also recharges your car battery.
What Can Go Wrong with an Alternator?
With time, your car’s alternator will start to wear. And it does so in various stages. Since it produces electricity by rotating three plates across a winding of copper wires, one of these plates may fail.
In this stage, the alternator will still function but the power levels will drop causing your battery to die at some point.
This is why you need to test your alternator regularly because you could be blaming your battery for no reason.
But this doesn’t mean that car batteries may not lead to wear of an alternator. A dying battery can also ‘stress’ your alternator.
Additionally, a belt spillage can also spill on the alternator’s pulley wheel forcing it to produce a lower voltage.
Before replacing your alternator, always rule out the cause to prevent this problem from occurring in the future.
Why Test Your Alternator?
Being one of the most essential components of your car, it is mandatory that you test your alternator regularly. Keep in mind that the alternator recharges your battery and powers electrical systems in your car.
A malfunctioning alternator can reduce the functionality of all these systems and interfere heavily with your driving experience.
To put more emphasis on why you should regularly test your alternator, you should know that a car can’t run with a bad alternator.
Yes, it may get you to your office or the store but once the power in your battery is out, then so will your car.
This can be quite dangerous because what happens if your car battery dies out in the middle of nowhere.
How to Tell If the Alternator Is Failing?
Because a failing alternator will reduce the electrical functionality of your car. Then you can tell if yours is failing without even testing it.
Here are the warning signs you should be on the lookout for;
- Pulsating headlights or dimming
- An electrical burning smell coming from the alternator
- The battery warning light on your dashboard
- A squealing noise coming from your car engine
- Your car’s audio system and other electrical functions may work irregularly
How to Test the Alternator?
It is recommended that you do so every three to four months. Below we will discuss how you can do so with or without a voltmeter.
Let’s Start with Testing the Alternator with a Voltmeter
Getting your hands on a voltmeter shouldn’t be a problem because there are plenty of options from Amazon or your nearest auto store.
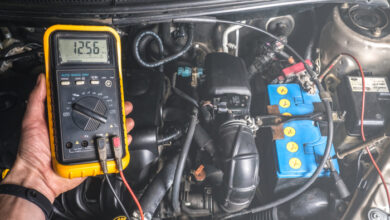
Step I – Prepare the Voltmeter
Ensure that it reads 0.00 volts before attaching the positive and negative to the respective battery terminals. And do a quick reading of the battery before switching the engine on and note it down. Before doing any test on your battery, ensure the terminals are free from deposits or debris.
Step II – Measure the No-Load Voltage
To do this, you will need the support of another person who will keep the engine running at 1500 RPM, enough speed to get the alternator spinning. While doing this, you should turn off all electric appliances in your car including the car radio.
Once your battery has been fully charged, test the reading which should range somewhere between 13.1 to 14.6 volts. To know that there is something wrong with your alternator then there will be no change in reading when the engine is both on and off.
Or if you notice a drop in reading. An increase in more than 2 volts is an indication that the alternator is overcharging your battery.
Step III –Measure the Load Voltage
The final step is to test the alternator when it is under heavy usage. Ask the other person to increase the speed to 2000 RPM and switch on the lights, radio, wipers, and other electrical appliances.
The ideal reading should be more than 13 volts. That will show the alternator is strong enough to power your car. If it’s less than 13 volts, then you could be dealing with a faulty alternator.
What If You Don’t have a Voltmeter?
If it’s your first time testing your alternator, chances are you are not prepared and probably don’t have a voltmeter. However, you can still test it through the following methods;
- Confirm the condition of the alternator’s drive belt. If it is worn out then your alternator won’t be able to draw enough energy from the engine.
- Switch on the engine and listen if you can hear a clicking sound in the area where your alternator is located.
- Perform a headlight test in a dark environment. If the lights start dimming on their own then your alternator could be faulty.
Even before you get to the point of testing your alternator, always be on the lookout for warning signs. Investing in a good voltmeter can save you from a lot of car trouble.
That aside, if you are not sure how to go about this, you should call a mechanic to provide professional assistance.