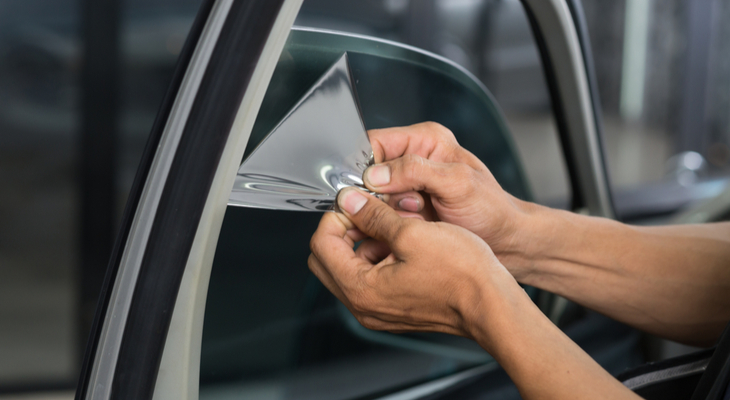
When you decide to update your vehicle, you may want to consider removing the tint from your car windows first.
Since window tint begins to degrade over time, many professional window tint technicians recommend replacing your tint within 5 years or less.
This time frame is dependent upon the standard quality of the tint, the proper installation, and the amount of maintenance that has been done.
Fortunately, removing tint from your windows is a lot easier than it actually sounds. With the proper tools and instructions, you can do this job yourself by using these 5 easy steps.
Step 1: Gather the Materials and Supplies for the Removal Process
Before gathering all of the material and supplies for the removal process, pay close attention to the different window tint removal techniques. Here are the 4 different methods that you should make your selections from.
- Soap and Scrape Method
- Soap and Newspaper Technique
- Ammonia and Sun Technique
- Hair Dryer Method
Each of these methods requires different materials and supplies. Therefore, you need to decide which method is best for you. For instance, if you select the soap and scrape method to remove the old window tint, you need the following items:
- Dish Soap
- Glass Cleaner
- Spray Bottle
- Clean rags or Paper Towels
- Razor Blade or Knife
- Water
If you select the ammonia and sun technique to remove the old window tint, you need the following items:
- Newspaper
- Sponge
- Bucket or Bowl
If you select the soap and newspaper technique to remove the old window tint, you need the following items:
- Spray Bottle
- Steel Wool
- Paper Towels
- Scissors
- Plastic Garbage Bats
- Dish Soap
- Ammonia solution
If you select the hairdryer method to remove the old window tint, you need the following items:
- Handheld Hairdryer
- Glass Cleaner
- Paper Towels
- Cloth
- Razor Blade or Knife
If you select the steam method to remove the old window tint, you need the following items:
- Water
- Adhesive Remover
- Fabric Steamer
- Cloth or Paper Towels
Review each of these methods to see which one is the best option for your procedure. After you have made your decision, gather all of the supplies and toolsthat are needed for that particular window tint removal procedure.
For instance, if you are using the steam method technique to remove the tint from car windows, you need water, adhesive remover, fabric steamer, and paper towels.
Step 2: Prep Your Car for the Procedure You Have Selected
After you have all of your materials available, remove anything off of your windows that can complicate the process. For instance, if you have any types of stickers or decals on your windows, remove them prior to starting the official process.
Steam and Hairdryer Method Prep
The hair dryer and steamer methods usually require some form of electricity. In both of these cases, choose an extension cord that is long enough to reach both inside and outside of your vehicle sufficiently.
Step 3: Apply One of the following Methods to Remove the Window Tint
To minimize the mistakes, start the process by removing the window tint from the smallest panel first. Here are the instructions for each technique.
Soap and Scrape
Lift the corner tint film from your smallest panel with your razor blade, and then grab the tint film with your fingers. Peel the film carefully from its surface until it has been completely removed.
Soap and Newspaper Method
- Create a mixture of water and soap (i.e. thick or thin texture, it is up to you) and then pour it in a spray bottle.
- Spray the soapy solution on the tint film liberally and then cover the tint with newspaper. Let the newspapers remain on the film for at least an hour.
- After an hour has elapsed, use your razor blade to peel back the newspaper and the window tint simultaneously.
Special Note: Check the condition of the newspaper every 15 to 20 minutes to ensure the texture is still moist. If not, spray more of the soapy mixture until it is no longer dry.
Ammonia and Sun Method
- Create a mixture of water and ammonia (i.e. thick or thin texture, it is up to you) and then pour it in a spray bottle.
- Spray the ammonia solution on the tint film liberally (inside the window and outside the window) and then cover the tint with a plastic garbage bag. Let the plastic garbage bags remain on the film for at least an hour.
- After an hour has elapsed, peel back the garbage bags and the window tint simultaneously. If any residue is left, use a razor blade to scrape it off.
Hairdryer Technique
Turn your hairdryer on to the highest setting. Once the hairdryer is at its hottest, point the hot air directly towards the window film (approximately 2 inches away) on the corner of your window. When the window film begins to curl up, peel the window film off of the window.
Steamer Technique
Turn your steamer on to the highest setting. Once the steamer is at its hottest, point the hot air directly towards the window film (approximately 1 inch away) on the corner of your window. When the window film begins to curl up, peel the window film off of the window.
Step 4: Remove Residue from the Adhesive Window Tint
Once all of the window tint film has been peeled off of your windows, remove any leftover residue that remains. Here are several different ways to make sure that all of these remains are completely gone.
- Remove the residue with a razor blade, after you liberally spray your soapy water.
- Carefully remove the residue with ammonia and a steel wool pad. Take special care in using the steel wood pad, however, to prevent scratching the glass portions of your window.
- If you are using the hairdryer or the steamer method, reapply more heat to remove all of the left over residue.
- Use glass cleaners and commercial products to remove the remaining adhesive with ease.
5. Clean-Up – After Care Routine
Once all of the residues from the window tint adhesives are gone from your windows, there is one more thing that you will need to do to complete this job.
Clean each window by spraying your favorite window cleaner, and then dry the window glasses with paper towels. This step will not only leave your windows clean but also shiny and pristine.
Bottom Line
Removing old tint from your windows is not as difficult as many of you may think.
Even if you are not a professional window tint technician, you can use one of several different effective techniques to do this job.
From removing all of the window tint films with soapy water and a razor blade technique to using a handheld steamer to take off your vehicle’s window tint films, all you have to do is follow the guidelines provided for you above.
Make sure to read our latest post on the best wax for your car in 2020!